The MSR Stove Maintenance Guide
Have you ever been on a multi-day backcountry trip and dealt with a sputtering, inconsistent flame from your camp stove? Or maybe your stove stopped working altogether and you didn’t read up on how to make the normally easy fix required? These sorts of troubles can be no small emergency on a multi-day trip, especially if a large chunk of your calories need cooking or you’re melting snow for water.
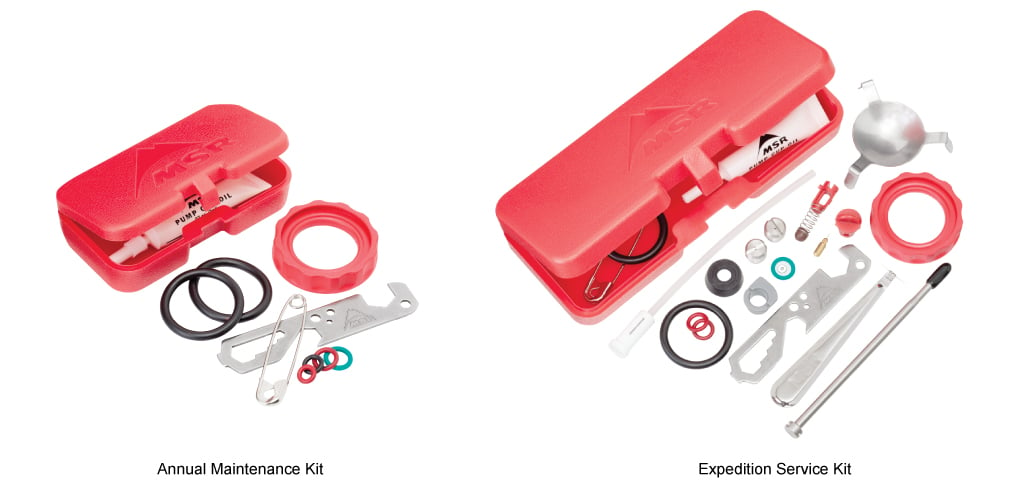
That’s why stove maintenance—particularly with liquid fuel stoves—is so critical. In fact, every MSR stove has been intentionally designed to be easily user-maintainable for a long, reliable life. Our Annual and Expedition Stove Maintenance Kits, along with intuitive, field-maintainable designs, keep this essential task easy to do, ensuring you never get stuck without the fire you need.
With that in mind, we’ve crafted this omnibus resource for all of your stove maintenance needs. From a basic overview of the what and why to a centralized resource for all stove maintenance videos and instructions–we’ll cover it all right here.
Let’s start off with the easy stuff:
Canister Fuel Stove Maintenance
We’ll get these out of the way first, because one of the reasons you likely bought a canister stove in the first place is that they are virtually maintenance-free. They have few moving parts and burn exceptionally clean, so you and your canister stove are all set for a long, hassle-free life together. You should, however, periodically inspect your stove for a few key things:
- Damaged/bent pot supports and joints: These could cause a collapse if they are weak or broken. Inspect for straight supports and smooth operation of folding joints
- Damaged/dry/cracked gasket: This is located in the base of your stove, where it attaches to the fuel canister and ensures an air-tight seal. A damaged or worn-out gasket can cause a fuel leak, which is clearly a bad thing. If you suspect a compromised gasket, do not try to repair it yourself. Reach out to our Repair staff for help. You’ll have to send in your stove for a proper repair, but they’ll get you safely rolling again.
- Foreign objects in burner head: If a blue flame is not coming out of one or many ports in the burner head, something is likely blocking the fuel flow. This is often attributed to small rocks or other debris like food from a boil-over. A clogged port or two should not dramatically affect performance, but significant blockages will. If you keep your stove clean and protected when packed, this should never really be a problem. If you have a messy boil-over, turn off your stove and allow it to cool. Then clean it off with a damp rag. Stubborn debris may require submersing the burner head in water and soaking/agitating it to loosen what’s in there. If you do that, be sure to dry it thoroughly with a rag and let it sit in a well-ventilated area for a day or so to dry its innards before firing it up or storing it.
- Triggering the Thermal Trip on WindBurner® Stoves: A thermal switch protects our system stoves from overheating. Trip it (most often because people try to use non-system cookware with their system stoves, which radiates too much heat back to the stove), and the stove shuts down to protect you. While this is a dead end for the Reactor (such heat would likely damage other internal components), the WindBurner stove’s thermal trigger can likely be reset manually to get you back to burning. Here’s how:
- Wait 5 minutes for the stove to cool (mandatory!). Disconnect the fuel canister from the stove.
- Open the Flame Adjuster counterclockwise two full turns.
- Insert one leg of the Fuel Canister Stand into the hole in the stove’s mixer tube. (It should stop against the mixer tube.)
- Rotate the leg clockwise to press the brass jet downward until a click is heard.
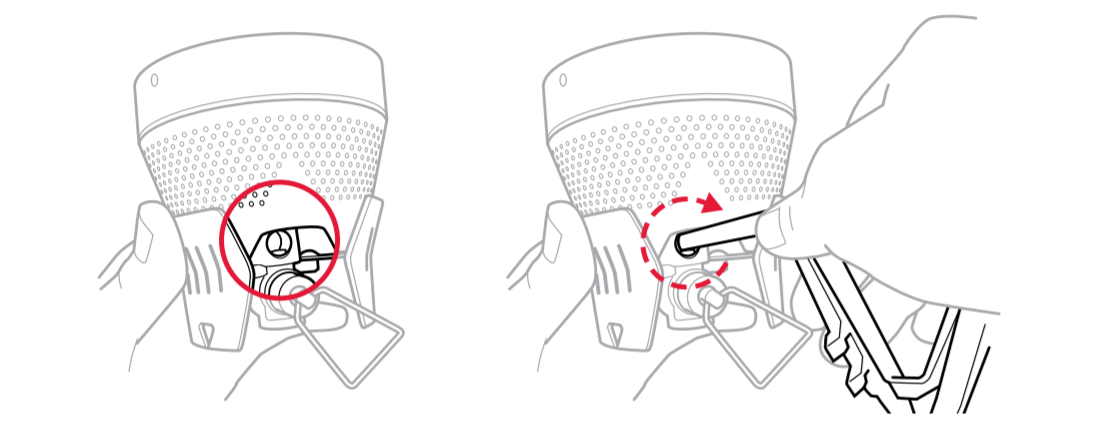
- Close the Flame Adjuster before reconnecting the fuel canister. The stove is now ready for use.
Note that repeated tripping of the stove might mean something more is wrong inside, Our lawyers would like to remind you that this could cause fuel to leak, which could, in turn, cause fire, burns, severe injury, or death. If the stove’s Thermal Trip continues to activate, discontinue use of the stove and contact us.
Aside from outright crushing it, not much else could go mechanically wrong with your canister stove. While the general lack of maintenance is a huge plus, the majority of these things are not field maintainable. That’s why checking your canister stove before each trip is extra important.
Liquid Fuel Stove Maintenance
While requiring more maintenance than canister stoves, liquid fuel stoves are still the best bet for the reliability of finding fuel wherever you travel. MSR liquid fuel stoves are virtually indestructible—with a few spare parts on hand, you can easily fix just about any issue that could arise anywhere on Earth. This level of reliability is why we’ve seen and heard so many stories of old MSR stoves from the 70s being pulled from a closet shelf and firing up, needing nothing more than a few new gaskets or drops of lubrication. This exceptional field maintainability, legendary durability, and, in some cases, multi-fuel compatibility are also why liquid fuel stoves are an excellent choice for emergency preparedness kits.
We’ll start with some general tips, but feel free to jump ahead to any of the following links for specific reference:
- WhisperLite® Series Stove Maintenance
- DragonFly® Maintenance
- XGK-EX® Maintenance
- Fuel Pump Maintenance
GENERAL CARE AND FEEDING OF LIQUID FUEL STOVES
Fuel Lines and Jets
The most common problems with liquid fuel stoves are dirty fuel lines and clogged fuel jets. These issues result from heavy use and/or burning fuel other than white gas. Of course, we design stoves to be compatible with multiple fuels (e.g., DragonFly®, WhisperLite® International, and XGK-EX® stoves), but nothing burns as clean as white gas. Even the purest fuels, like our SuperFuel® white gas, can accumulate residue after many hours of stove operation. If you’re burning dirtier fuels such as diesel, unleaded gas, or kerosene, you’ll need to clean the fuel lines and jets regularly.
(Pro Tip: If you ever need to burn auto fuel, burn the lowest grade unleaded fuel you can find. That may seem counterintuitive, but premium unleaded fuels have many additives that will clog a stove much faster.)
Fuel Pumps
The other component that most commonly needs maintenance is the fuel pump. The pump pressurizes the bottle, helping to vaporize the fuel for proper combustion. This requires air-tight seals via soft bits that can dry out or crack over time. Most frequently, a little silicone lube on the fuel pump cup is all that’s needed. If your fuel pump has been sitting for a while, or there are visible fuel leaks when the fuel bottle is under pressure, proactively replacing all the gaskets, o-rings, etc. (in addition to the compromised one) will save you some headaches in the field.
STOVE MAINTENANCE VIDEOS AND INSTRUCTIONS
Below are links to stove-specific maintenance videos for each of our liquid fuel stoves, along with full transcripts for easy screenshots and those who prefer words over visuals. You can also reference each stove’s Instruction Manual on our website under the “FAQs and Documents” tab on each stove’s product page.
WhisperLite® Stove Maintenance
For WhisperLite and older WhisperLite International stoves with wire legs:
For current WhisperLite Universal and WhisperLite® International stoves with flat, stainless steel legs:
Stove Maintenance Instructions for All WhisperLite® Stoves
These instructions cover all MSR WhisperLite stoves to date. Please note there will be some different procedures noted between stoves with the old wire legs and the current WhisperLite Universal and WhisperLite International models with flat, stainless steel legs. Find more information on WhisperLite Stove maintenance.
Clearing A Clogged Jet
After several months of frequent use, deposits may have built up in the fuel line and be clogging the jet. If your WhisperLite stove’s performance is compromised, first try to clear the jet by using the stove’s built-in shaker needle.
How to Use the Shaker Needle
- Close the control valve on the pump to turn off the stove and wait five minutes for it to cool down.
- Disconnect the stove’s fuel line from the pump and shake the stove up and down. You will hear the shaker pin clearing the jet.
- Reattach the fuel line to the pump.
- Prime and run the stove as usual. In most cases, the stove will once again perform well.
Manually Cleaning the Stove’s Jet
Over time these deposits can build up to the point where they cannot be cleared by the shaker needle. In these cases, the stove may require more extensive manual cleaning of the jet and fuel line.
- Turn off the stove and let it cool for five minutes.
- Disconnect the fuel line from the pump.
- Fold the pot supports to their packed position.
- For the standard WhisperLite simply unscrew the priming cup.
**If you have the WhisperLite International or Universal, unscrew the priming cup and remove the wick.
- Slide the fuel line generator loop out, then replace the priming cup to keep the pot supports in place.
- Using the jet and cable tool, unscrew the stove’s jet and shaker needle. Make sure you do not bend the fuel line generator loop.
- Manually clear the jet using the jet cleaning wire or the needle on the shaker.
Replace the Stove’s Jet
The hole in your stove’s jet is very small but you should be able to see through it when holding it up to a light. If you can’t see through the jet’s hole and are unable to clear the blockage sufficiently, replace it with a new jet from the Expedition Service Kit, making sure it is the same jet type. There are six types of jets provided in the WhisperLite Expedition Service Kit and most are marked with a letter code stamped on the head of the jet indicating which fuels and stoves they are compatible with. They are as follows:
- G jet: White gas and unleaded auto fuel with both the current and previous models of standard WhisperLite
- K Jet: Kerosene with current older model WhisperLite internationals with wire pot supports
- IG Jet: White gas and unleaded auto fuel in older model WhisperLite internationals with wire pot supports
- UG Jet: White gas and unleaded auto fuel with current WhisperLite Universal and International models with flat, stainless steel pot supports
- UK Jet: Kerosene with current WhisperLite WhisperLite Universal and International models with flat, stainless steel pot supports
- UC Jet: Canister fuels with WhisperLite Universal
How to Clean the WhisperLite Stove’s Fuel Line
For WhisperLite Universal stoves it is necessary to first unscrew the fuel adapter from the fuel line before accessing the fuel line cable. Learn more about what to do if the fuel line is stuck.
- Slide the jet and cable tool over the tip of the fuel line cable and grab the cable by tilting the tool at an angle and then pulling it out. The cable may need to be loosened with a common lubricant such as WD-40 or pump cup oil.
- Wipe the cable clean and reinsert it into the fuel line.
- Using five-inch strokes, move the cable back and forth about 20 times to remove any deposits in the line.
- Remove the cable completely and wipe it clean.
**The WhisperLite Universal requires the liquid fuel adapter to be reinstalled to complete the next step. Before you do, inspect the o-rings and swivel rings at the end of the fuel line. If the o-rings are cracked or worn, remove them (the point of a needle works well) and replace them immediately. Lubricate them with pump cup oil and securely reattach the adapter to the fuel line.
- Reattach the fuel line to the pump and secure it with the latch.
- Pressurize the bottle with 15 pump strokes.
- Making sure there are no ignition sources or flames nearby, open the valve and flush three to four tablespoons of fuel through the stove and into a container. Always operate the fuel bottle with the valve handle facing up.
- Safely dispose of the fuel used to flush your stove.
- Turn off the valve and detach the fuel line from the pump.
- Replace the cable into the fuel line until it is almost completely inserted.
- Replace the shaker needle and the jet. To do this, place the shaker needle inside the jet before screwing it in.
- Use the cable tool to make sure that the jet is tightly fastened.
- Remove the priming cup and slide the fuel line generator loop back into position.
**If using the WhisperLite International or Universal be sure to replace the wick before securely fastening the priming cup. - Prime and run the stove.
If the stove is still not running at full capacity, repeat the cleaning process.
Download the WhisperLite, WhisperLite Universal, and WhisperLite International Instructions Manuals for more information.
DragonFly® Stove Maintenance
Stove Maintenance Instructions
To perform all the maintenance described, you will need the Dragonfly Expedition Service Kit
If your Dragonfly stove’s performance is compromised, first try and clear the jet by using the stove’s built-in shaker needle.
How to Use the Shaker Needle
- Close the control valve on the pump to turn off the stove and wait five minutes for it to cool down.
- Disconnect the stove’s fuel line from the pump and shake the stove up and down. You will hear the shaker pin clearing the jet.
- Reattach the fuel line to the pump.
- Preheat and then run the stove as usual.
In most cases, the stove will once again perform well.
How to Clean the DragonFly Stove’s Jet
Over time these deposits can build up to the point where they cannot be cleared by the shaker needle. In these cases, the stove may require more extensive manual cleaning of the jet and fuel line.
- Turn off the stove and let it cool down for five minutes.
- Disconnect the fuel line from the pump.
- Remove the flame spreader.
- Thread the DragonFly cleaning tool through the jet and cable tool.
- Unscrew the jet and remove the shaker needle.
- Manually clear the jet using the jet cleaning wire or the needle on the shaker.
The hole in your stove’s jet is very small but can be seen when held up to the light. If the jet has a blockage that you cannot clear, replace it with a new jet from the service kit, making sure it is the same jet type. There are two types of jets available for the Dragonfly stove. The fuel type is designated by a letter code stamped on the head of the jet.
- The DG jet is used for white gas and unleaded auto fuel.
- The DK jet is used for kerosene diesel and jet fuel.
Both jets are provided in the Expedition Service Kit.
How to Clean the DragonFly Stove’s Fuel Line
- Using the jet and cable tool, loosen the flame adjuster stop nut and remove the flame adjuster by unscrewing it counterclockwise.
- Inspect the o-rings at the head of the flame adjuster. If they are worn or broken, replace them with o-rings from the repair kit.
- Take the wire handle off the flame adjuster and attach it to the Dragonfly cleaning tool.
- Slide the cleaning tool into the flame adjuster valve.
- Using pressure, rotate the tool clockwise about 20 times.
- Remove the tool and tap the adjuster valve against a hard surface to remove any loosened deposits.
- Reinsert the flame adjuster by screwing it in clockwise and securing it with the lock nut.
- Connect the stove to the pump and secure it with the latch.
- Pressurize the bottle with 10 to 15 pump strokes.
- Fully open the pump control valve and the flame adjuster valve, then flush three or four tablespoons of fuel through the stove and into a container. Always operate the fuel bottle with the valve handle facing up.
- Close the pump valve followed by the flame control valve, then remove the fuel line from the pump.
- Safely dispose of the fuel used to flush your stove.
- Place the shaker needle into the jet so the needle points up and into the small hole.
- Turn the stove upside down and screw in the jet, making sure it is tightly fastened.
- Replace the flame spreader.
- Preheat and run the stove.
If the stove is still not running at full capacity, then the fuel line filter may need to be replaced.
How to Replace the DragonFly Stove’s Fuel Line Filter
- Remove the fuel line from the pump and fuel bottle using a safety pin.
- Remove the small fuel line filter from the tip of the fuel line.
- Take a new filter from the maintenance kit and place it on a hard surface.
- Center the end of the fuel line over the filter and push the fuel line down until the filter is fitted inside.
- Before lighting your stove, you should always ensure that there are no leaks, especially after maintenance. Preheat and then run the stove.
If the stove is still not running at full capacity, repeat the cleaning process. It is recommended that you perform this maintenance check before taking the DragonFly on expeditions or long trips.
Download the DragonFly Instructions Manual for more information.
XGK Stove Maintenance
Stove Maintenance Instructions
To perform all the maintenance described, you will need the XGK Expedition Service Kit
If your XGK stove’s performance is compromised, first try to clear the jet by using the stove’s built-in shaker needle.
How to Use the Shaker Needle
- Close the control valve on the pump to turn off the stove and wait five minutes for it to cool down.
- Disconnect the stove’s fuel line from the pump and shake the stove up and down. You will hear the shaker pin clearing the jet.
- Reattach the fuel line to the pump then preheat and run the stove
In most cases, the stove will once again perform well. Over time these deposits can build up to the point where they cannot be cleared by the shaker needle. In these cases, the stove may require more extensive cleaning of the jet and the fuel line.
How to Clean the XGK Stove’s Jet
- Turn off the stove and let it cool for five minutes before disconnecting the fuel line from the pump.
- Using the jet and cable tool, remove the flame spreader from the top of the stove.
- Unscrew the stove’s jet and remove the shaker needle.
- Manually clear the jet using the jet cleaning wire or the needle on the shaker
MSR jets have a very small hole that can be seen when held up to the light. If the jet has a blockage, light will not pass through the pinhole. If the hole cannot be cleared, replace the jet with a new one from the service kit, making sure it is the same jet type. There are two types of jets available for the XGK stove. The fuel type is designated by a letter code stamped on the head of the jet.
- The GK jet is used for white gas, kerosene, unleaded auto fuel and aviation fuel.
- The X jet is used for diesel and jet fuel.
For the latest version of the XGK stove, use the jets that are short in height. For the older XGK model, use the tall jets.
How to Clean the XGK Stove’s Fuel Line
To clean the fuel line:
- Slide the cable tool over the tip of the fuel line cable and grab the cable by tilting the tool at an angle.
- Pull on the tool to remove the cable from the fuel line. In some cases, the cable may need to be loosened with a common lubricant such as WD-40 or pump cup oil. Learn more about what to do if the fuel line is stuck.
- Wipe the cable clean and reinsert it back inside the fuel line.
- Using five-inch strokes, move the cable back and forth approximately 20 times to remove any deposits in the line.
- To flush the fuel line, remove the cable completely again and wipe it clean.
- Reattach the fuel line to the pump and secure it with the latch.
- Pressurize the bottle with 15 strokes. Always operate the fuel bottle with the valve handle facing up.
- Making sure there are no ignition sources or flames nearby, open the valve and flush three to four tablespoons of fuel through the stove and into a container.
- Safely dispose of the fuel used to flush the line
- Reinsert the cable into the fuel line until it can go no further.
- Place the shaker needle into the jet so the needle points into the small hole.
- Turn the stove upside down and screw in the jet making sure it is tightly fastened.
- Replace the flame spreader making sure it is secured. If the flame spreader is corroded or has become damaged, replace it with a new one from the expedition service kit.
- Connect the stove to the pump and pressurize the bottle.
- Before lighting your stove, you should always ensure that there are no leaks, especially after maintenance. Preheat and run the stove.
If the stove is still not running at full capacity, repeat the cleaning process. It is recommended that you perform this maintenance check before taking the XGK on expeditions or long trips.
Download the XGK Instructions Manual for more information.
Fuel Pump Maintenance
Instructions
These instructions are for servicing any MSR liquid fuel pump, including previous generations of the pump. Pump maintenance will use the same kits as your liquid fuel stove with the Annual Kit handling basic repairs and maintenance, and the Expedition Kit allowing you to completely service all replaceable parts as described below.
First, Inspect Your Pump
If the plastic body of your pump has become cracked, burnt or damaged then it is beyond servicing. Please contact your local MSR dealer to purchase a replacement pump.
Check the Main Bottle Seal
- Check the main seal at the top of the threaded portion of the pump for any corrosion, dryness or cracking. If you are unsure whether the seal needs to be replaced, remove it and check thoroughly.
- To remove, push down with your thumbs and slide the seal off the pump assembly.
- Inspect the seal for any signs of wear or damage. If damaged, replace immediately.
- To reattach, slide the pump seal onto the pump so the molded side of the seal is seated away from the direction of the bottle attachment.
- Push and twist the pump seal until it is fitted.
- Check to ensure the two vent holes in the threaded area are visible for a correct fit.
If You Are Having Trouble Pressurizing Your Fuel Bottle, Check the Pump Cup
- To remove the plunger, pull it out to expose the “Open here” text marked at the beginning of the plunger’s taper on newer models, or just roughly halfway on older models.
- Rotate the plunger a quarter turn to the left and pull it out completely.
- If the pump cup is cracked or damaged, replace it with one from the Expedition service kit.
- If the pump cup is dry but undamaged, simply apply some pump cup oil to lubricate it.
- If the pump cup needs replacing, you should also service the check valve.
Servicing the Check Valve
The Check Valve is located inside the round end of the angled section at the base of the fuel pump. On older pumps, it is just at the base of the pump. When the check valve is not sealing properly, fuel leaks into the pump cup cylinder and dries out the pump cup. When working correctly you should hear the check valve open as you pump as noted at the time stamp in the video below:
- Use the MSR tool to unscrew the check valve and inspect the seal. On older pumps, you can simply turn the cover with your fingers.
- If the seal is dry or cracked, replace it with one from the service kit. On older MSR pumps the check valve seal may be a ball or the assembly may have a flat end. On current pumps, the check valve has a ball seal fitted to a spring and screw.
- For current pumps, replace the entire assembly.
- For older models replace the seal spring or screw. If you have the old flat-ended seal, replace the entire assembly with the new ball and assembly. (The video above is really helpful if you have any questions about which one you have!)
Check the Fuel Tube Bushing
While you have the plunger out of the pump cup cylinder, you should check the fuel tube bushing. This is where the stove fuel tube is inserted into the pump itself.
- To remove the fuel tube bushing, put the end of the stove tool in the horizontal slot to give it a half-turn and remove the insert.
- Use a safety pin to pull the o-ring from inside and check for any corrosion, dryness or cracking. Replace the o-ring if it is damaged in any way.
- Lubricate the o-ring with some pump cup oil before replacing the bushing. Replacing the bushing will re-seat the o-ring.
- Once the fuel tube bushing has been refitted, replace the pump shaft by lining up the bushings with the shaft and locking it in place.
It’s important to note that the red color on some MSR o-rings is just a Teflon coating used for identification which can come off if touched. This is not an indication that the o-ring needs replacement.
Check the Fuel Filter Assembly
The Fuel Filter is located on the end of the small plastic intake tube on the side of the pump.
If your pump is pressurizing the fuel bottle well, but the flow of fuel is compromised, the pump’s fuel filter may need replacement. The assembly includes the plastic tube.
- Use a sharp tug to remove the entire fuel filter assembly from the pump then replace it with a new one from the service kit.
- It is best to run your MSR stove on white gas kerosene or jet fuel depending on your stove type, although some models can be run on auto gas.
- The additives in auto gas are hard on your stove. If you must use auto gas, it is best to use low-grade fuel, as premium gas has even more additives.
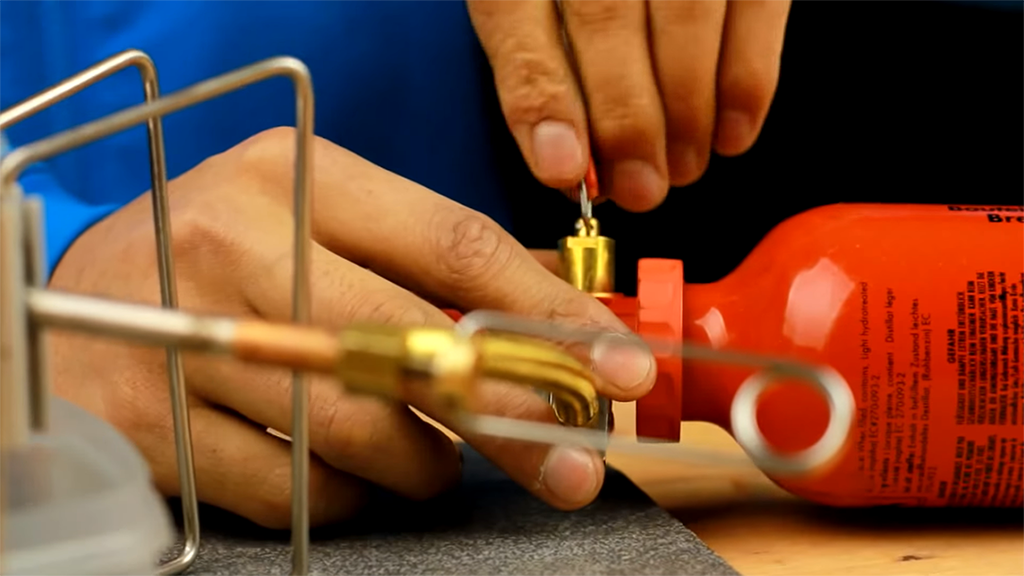
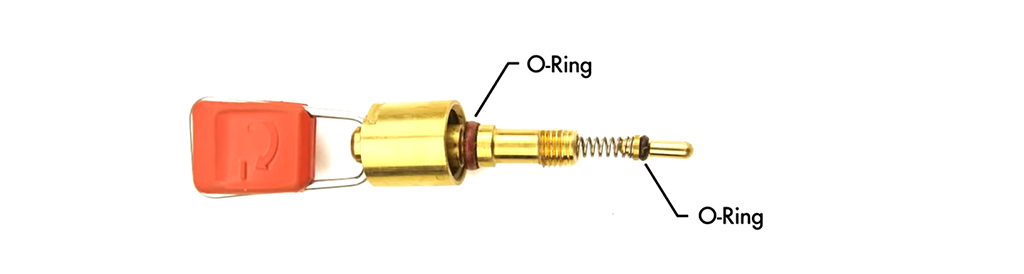
Check the Control Valve O-Ring
- Open the control valve and unscrew the stop nut (large brass fitting at its base) using the MSR stove tool. Remember to do a few turns of each, alternating.
- Check that the o-ring on the valve stem is not damaged. You are looking for nicks, cracking and general wear and tear. If the o-ring is in good condition, you can reuse it
- If the o-ring is damaged, remove it using a safety pin and replace it with one from the service kit.
**If you have a DragonFly® stove, the pump’s control valve has two o-rings, as pictured below. Check both and replace if necessary.
- Apply a drop of pump cup oil to the o-ring(s) and reassemble the control valve.
- To reassemble the stop nut, screw it back in and use the MSR tool to give it a 1/16 turn past finger tight to gently tighten.
Related Posts:
- MSR’s Seattle Repair Shop: Keeping Timeless Gear Alive
- MSR Stove Pump Maintenance
- MSR WhisperLite Stove Maintenance
 Jim Meyers
Jim Meyers survives between road trips by pushing all the buttons at Vertizon Photography He is also a recovering copywriter, turned freelance writer. He’s climbed, skied, backpacked, cycled and fly-fished extensively throughout North America and is selfishly raising two budding adventurers with his wife and Type-2 fun soulmate in Seattle, WA.
Updated. Originally Published October 6, 2021.