Snowshoeing: A Beginners Guide to Avalanche Safety
Snowshoeing is the winter equivalent to summer hiking, right? Or is it? Heading out onto your favorite trail with snowshoes on your feet may seem like a good idea, but avalanche conditions may not warrant safe travel. Before venturing out this winter, you’ll want to learn how to properly read winter terrain, as well as understand the risks associated with traveling through it. To help you do that, we’ve put together this guide to avalanche safety.
The basics of identifying avalanche terrain
One of the great things about snowshoeing is its simplicity. You don’t need to learn how to snowshoe (it’s just walking), and you don’t need complicated equipment. There’s a lot of beauty in this simplicity. However, if we translate that simplistic mindset to the way we travel in the mountains, it can lead us down the wrong path—quite literally.
Before heading out, we need to ask whether our intended route will take us through areas where avalanches can occur. To answer this, we need to know what avalanche terrain looks like. Let’s go over the basics.
Slope Steepness
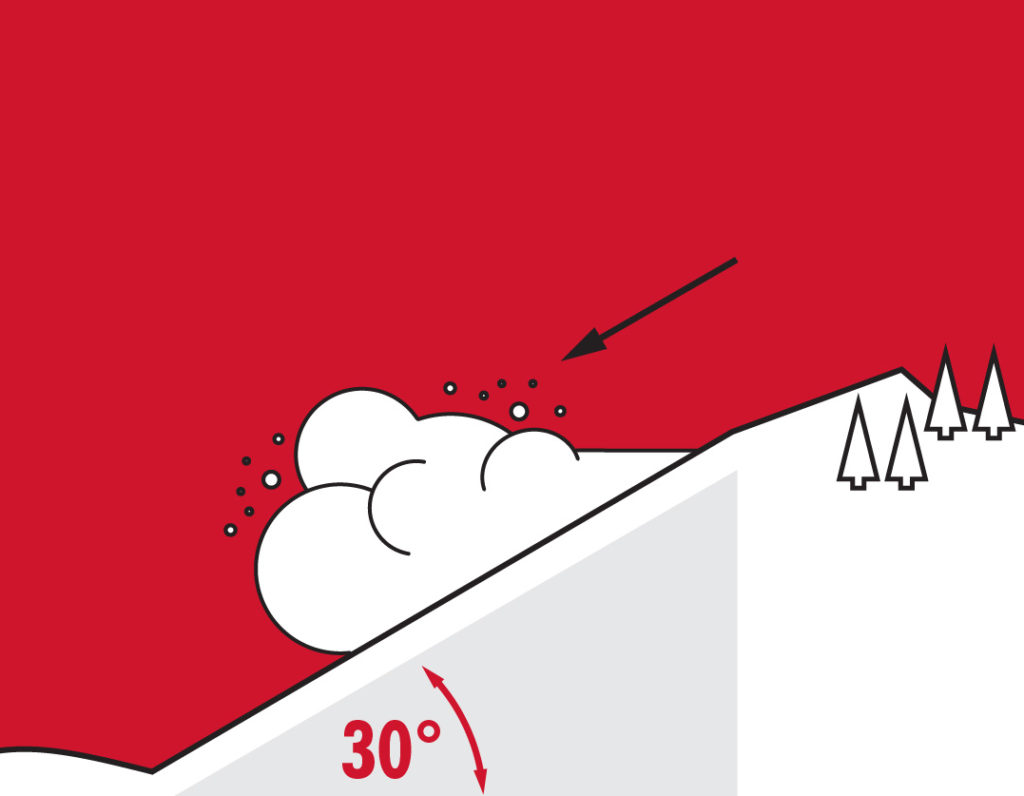
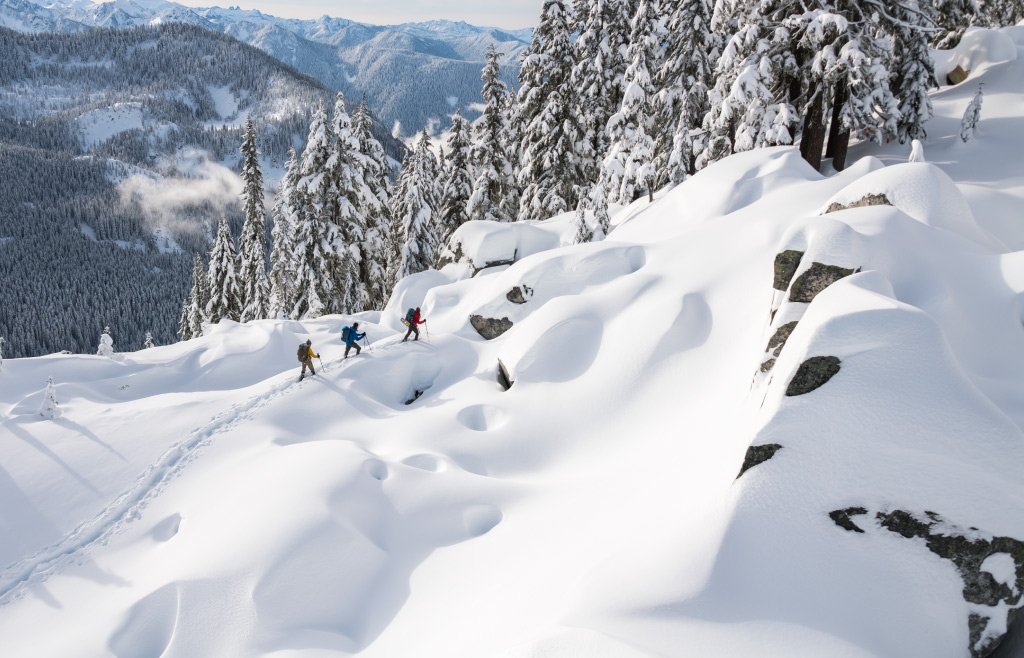
Avalanche-prone slopes are generally slopes angled 30 degrees and above—that’s the angle at which snow will slide. So if your route takes you across slopes of 30 degrees or more, you’re in avalanche terrain. It can be tough to judge the angle of the slope, and 30 degrees doesn’t look very steep. So it’s important to take the time to assess this.
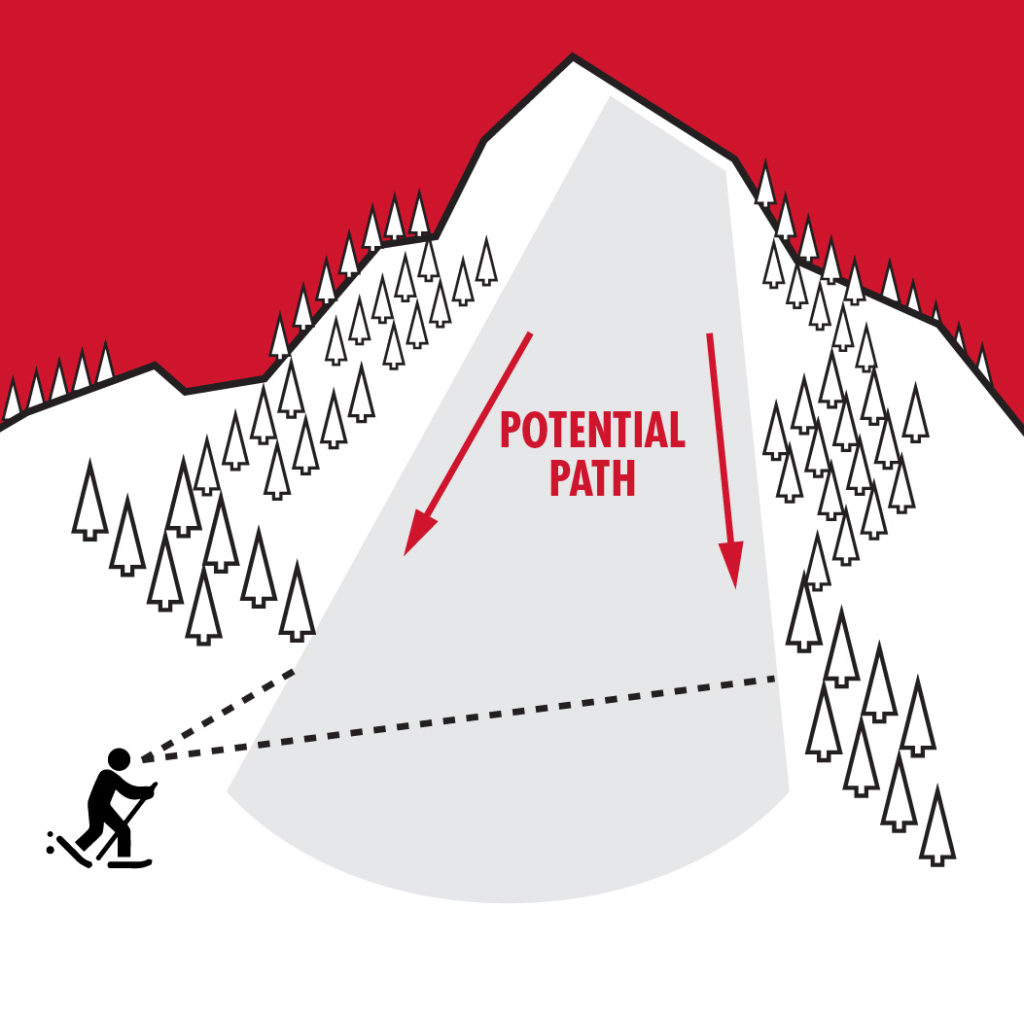
It’s equally important to consider the slopes around you and above you.
That’s because avalanche terrain has three parts. They include the Start Zone, the Track, and the Run-out. The Start zone lies somewhere on that 30+ degree slope. In the right conditions, an avalanche can start in this zone if triggered by a natural event or an unnatural one, like a human crossing the slope.
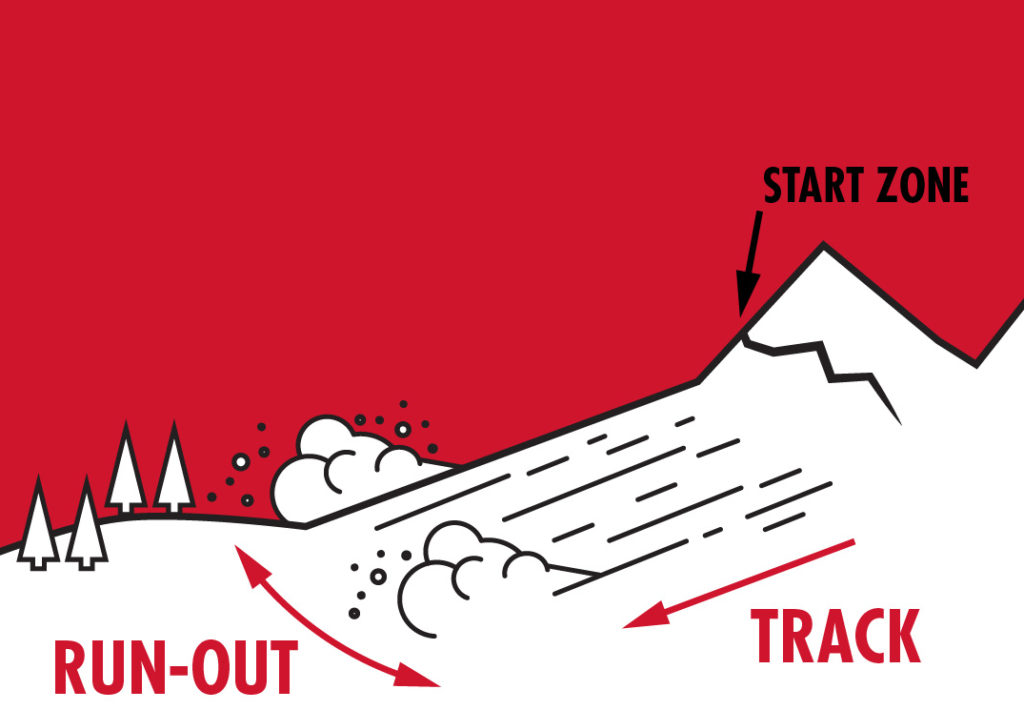
The other two zones—the Track and Run-out—lie below the start zone. They’re the zones the avalanche will pass through before it comes to a stop. The Track may be on a slope that’s less than 30 degrees and the Run-out may be completely flat. Because they lie in the path of a potential avalanche, they’re considered avalanche terrain.
For these reasons, you need to evaluate whether using your favorite summer trails as winter routes is a safe decision. Oftentimes it is. But in the wrong conditions, the steeper terrain above your route may expose you to danger.
Knowing what’s above you is paramount. Always ask yourself: Are there 30+ degree slopes located above me? Am I traveling through the Track or Run-out of a potential avalanche?
Features in the Terrain
Large, steep and open slopes are easy to point out and are the visibly obvious places where avalanches can occur. But there are many places where smaller terrain features can lead to avalanches. In the right conditions, features such as gullies, road cuts, and even little rises in the hillside or subtle micro features in the terrain can prove dangerous.
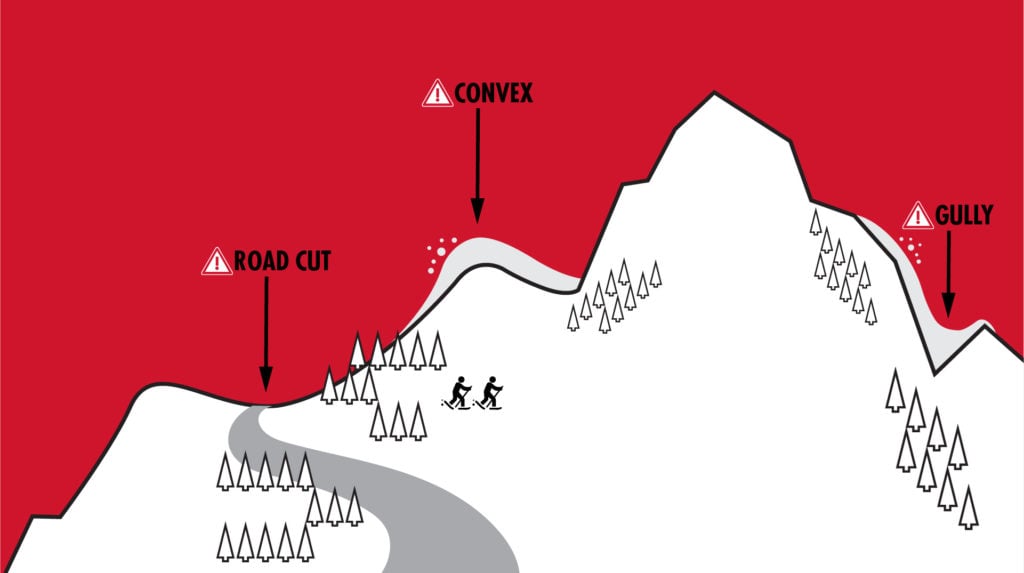
In addition, the start zone, track, and run-out can often be hard to determine. Yet, many popular summer hiking routes travel through these areas. Developing a keen sense of micro avalanche terrain is a skill that will help keep you safe.
Avalanche education classes
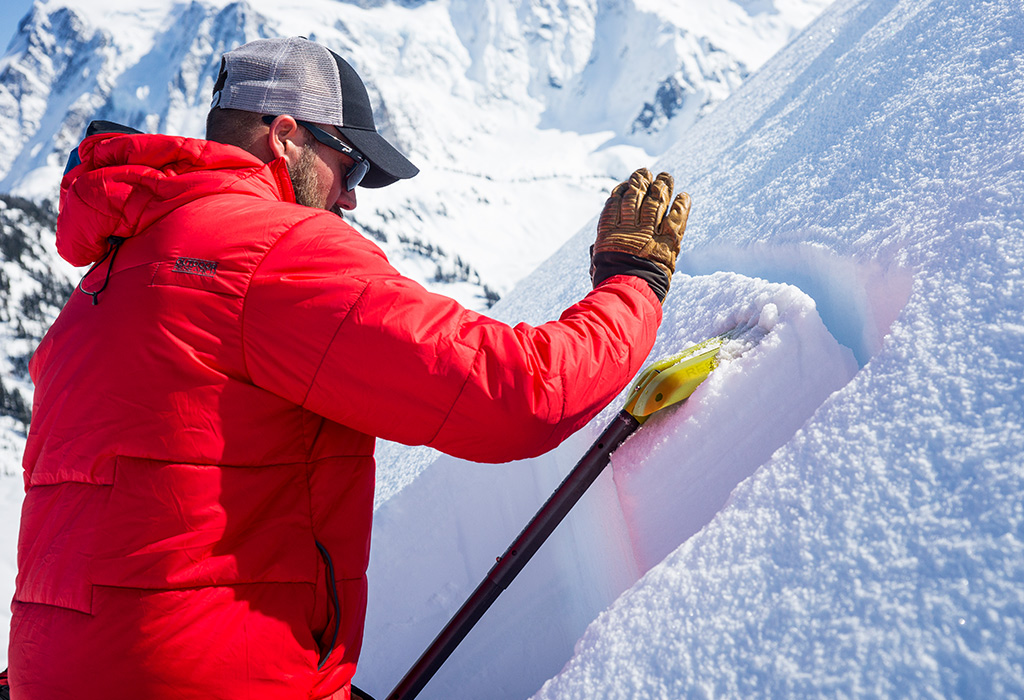
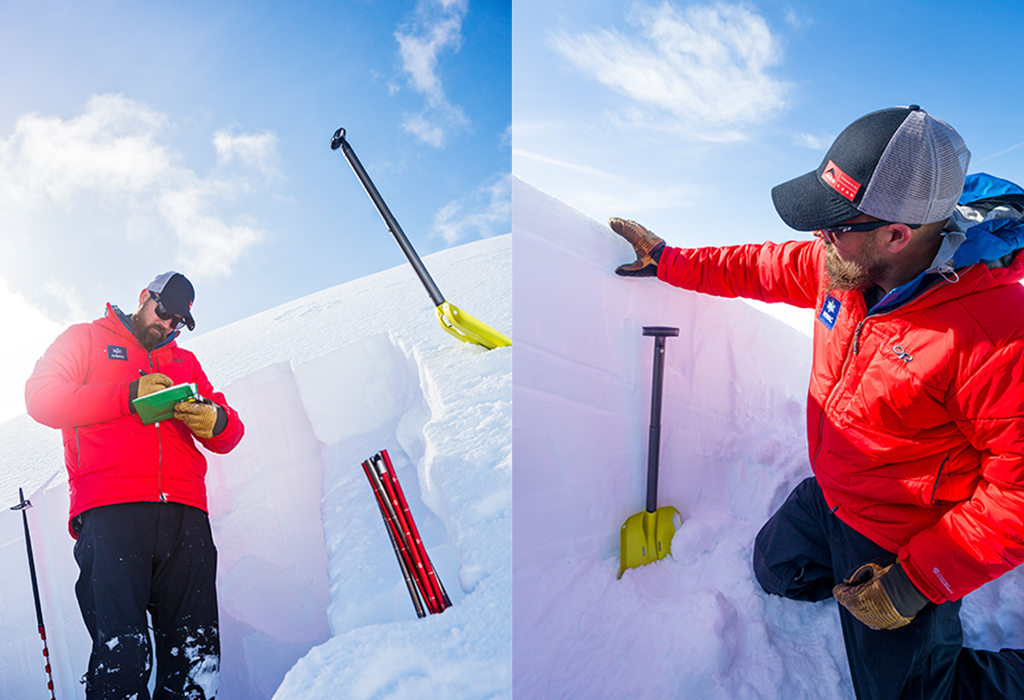
To build the skills you need for identifying avalanche terrain, we advise that you take an avalanche education course. Many retailers host free or low-cost introductory sessions to give you the basics. Then, for more in-depth workshops, check out the listings here and here.
Again, if we want to ensure that we’re not caught in an avalanche we can do one thing: avoid avalanche terrain.
Avalanche safety gear and precautions
But what if there’s a possibility that we will be traveling through avalanche terrain? First, make sure to read the avalanche bulletin from your local avalanche center for the day’s risk level. Next, pack the appropriate safety gear.
In addition to the 10 Essentials and extra clothing and food, you’ll need avalanche gear. Avalanche gear is considered your transceiver, probe and shovel.
If you can guarantee you won’t be traveling in avalanche terrain, you don’t need avalanche gear. However, if you’re unsure or if your route crosses through avalanche terrain, then you—and everyone in your group—need all three pieces of this safety gear, along with the knowledge to use them.
Taking an avalanche class that takes you into the field is one of the best ways to gain this experience. Your instructor will show you what avalanche terrain looks like and help you better understand how to avoid it.
Winter can be a spectacular time to enjoy the mountains. To stay safe while walking or hiking through it, just make sure you know before you go: will you be in avalanche terrain?
For more tips, check out MSR’s backcountry basics safety tips.
More online resources can be found at the bottom of Plan it Like a Pro—Strengthening Your Pre-Season Backcountry Brain
Here’s to a safe winter!
—
Written by Scott Schell
Scott is the Program Director of the Northwest Avalanche Center (NWAC) in charge of the education program and observers network. He is a certified AMGA Ski Mountaineering Guide who has guided throughout the US, Alaska, Canada, and Europe. He is a former AMGA ski discipline instructor and AMGA Board Member. An avid ski mountaineer, Scott has been involved in avalanche and guiding education for over 16 years. He is an Instructor and Instructor Trainer for AIARE. Scott is the co-author of Backcountry Skiing, Skills for Ski Touring and Ski Mountaineering.
Related Posts:
- Assessing Avalanche Danger: Backcountry Ski & Snowmobile Trip
- Avalanche Safety: What Every Snowshoer Needs to Know
- Backcountry Basics: How to Use Your Beacon, Probe & Shovel
Updated. Originally Published January 5, 2019.