Behind The Photo: How To Get that Glowing Tent Shot
Originally published on October 6, 2014.
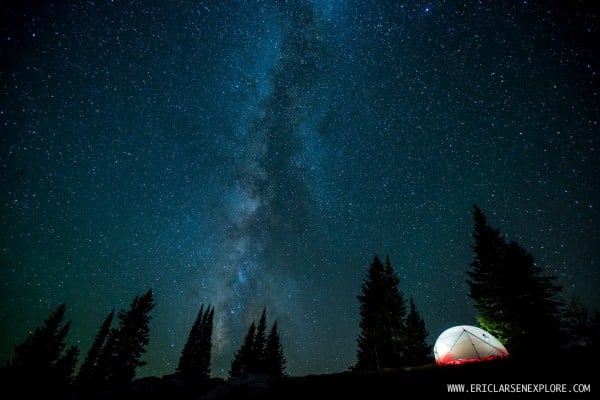
Photo and story by Eric Larsen
Full disclosure: I’m not a professional photographer. Still, as someone who has held a camera in his hand for the better part of the past 20 years in some of the world’s most extreme and inhospitable environments, I’ve managed to snap a few sweet pictures along the way, many of which have gotten published or sold.
Nearly every day, I use photos to help tell stories of my adventures and connect people to the places I’ve been. My goal has always been to try to inspire and educate, and photographs have been and continue to be a powerful tool to help create a sense of place. Over the past 10 years, I’ve been singularly focused on improving my photography skills, but it’s been a slow process for me. After all, modern cameras are just as much ‘computer’ as your computer so mastering the technology inside a camera takes time. Equally important (and complicated) is understanding the ‘art’ of photography. Creating compelling images in today’s photography world is equal parts nerd and Picasso.
Luckily however, I’ve been able to meet a lot of professional photographers along the way. Really good ones. You know, people who take pictures for National Geographic. And a bunch of others as well. What follows is an amalgamation of information I’ve accumulated over the years—advice from pros, a lot of research, rereading of owner’s manuals, and perhaps most importantly, my own insight from mistakes and practice.
So without further ado, I give you Eric Larsen’s guide to taking pictures of your tent at night.
(Side note: Tents are one of my favorite photographic subjects!)
1. Get good gear. At least as good of gear as you can afford. I’ve always struggled with the cost of camera equipment and each time I’ve made a purchase I’ve sweated over the cost relative to the benefits for months. However, I’ve never regretted any purchase. Good camera gear is expensive but the results are instantly noticeable.
2. Tripod. You don’t necessarily need a tripod, but it’s going to make things a lot easier. While I’m a pro at balancing my camera up on rocks, backpacks and tree branches, it is exponentially easier to set up a your shot with tripod. Because night photography requires longer exposures, it is paramount that you have a way to secure your camera so that it doesn’t move when the shutter opens and closes.
3. Rule of Thirds. Placing your main subject (or horizon) in one of the horizontal or vertical thirds of your picture will create a more compelling and dynamic image. For night photography, the goal is generally to have as much of the stars and sky as possible I tend to line up the horizon in the lower third (and sometimes even lower) of my frame.
4. Camera settings. Most cameras today have a manual setting that lets you control the aperture, shutter speed and ISO. Understanding each of these and the effects they have on your image is critical as nearly everything in photography is about light and exposure.
The aperture is the ‘hole’ in the lens which controls how much light enters the camera. A lower aperture means a bigger hole which lets in more light. For night photography a lower aperture is better (because it’s a bigger hole in the lens and more light gets in). I generally shoot between f2.8 and 4.0 at night.
The next way to modify your exposure is through the shutter speed. A faster shutter speed lets in less light and a slower shutter speed lets in more light. For night photos, my shutter speed ranges from 10-30 seconds (versus 1/60 of a second and faster in the day).
Finally, there is ISO which is your camera’s sensitivity to light. Your camera’s ISO will range from 100 (sunny daylight) to over 12,000 depending on your camera. At night, I increase my ISO anywhere from 800-2500 and sometimes way higher. Be aware that the higher the ISO, the more ‘noisey’ or grainy your image will look. Some of this can be fixed with photo editing software, but try to keep your ISO as low as possible while still getting a proper exposure.
5. Experiment. My photography was terrible until the digital revolution. Being able to immediately see the results of each camera setting allowed me to experiment and translate each number into an actual change in the character and quality of my image. Try to change one setting at a time versus all three. For example, if your image is too dark, try decreasing your camera’s shutter speed as a first step. If your image is still too dark, try increasing the ISO.
On a side note, I’ve talked to hundreds of photographers about these settings and they all say something a little different. Some shoot only at certain ISO’s or lower. Others only with a wide open aperture. While there are some hard-and-fast rules, some opt for a perfect picture in the camera – others fix problems in a photo editing program. Be aware that it is best to adhere to guidelines but ‘rules’ are often bent.
6. Go to cool places. I guarantee there are 1,000 people that can take a better picture than me of the Arctic Ocean, but guess what? None of them have the skills and stamina to do a polar expedition to the North Pole. Therefore, by default, I’ve got the best North Pole expedition photos on the planet. Yes, a great photographer can make the ordinary into art, but for the rest of us, we sometimes need a little extra help. If you want to get an beautiful shot of your tent at night, go to a place that’s interesting or at least has a few interesting features. (Even in your local area I bet there is a place that you know better than anyone else.)
OK, now on to taking a picture of your tent at night.
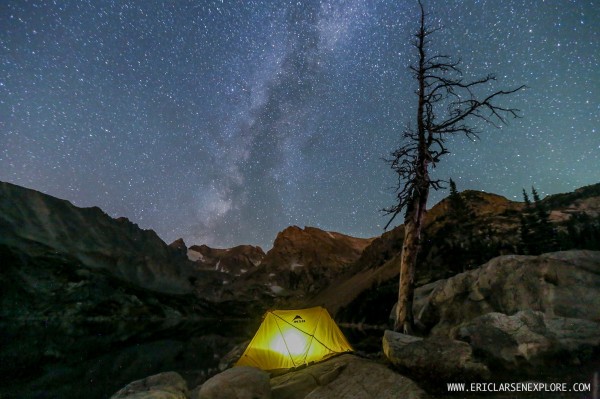
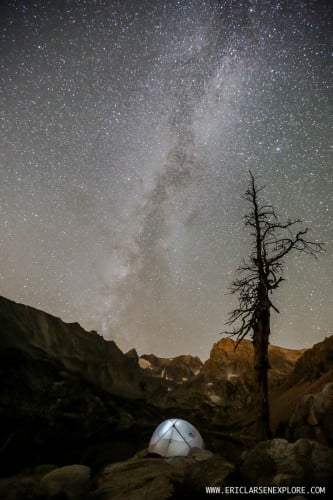
1. Find the right spot. I like to shoot from slightly lower spot—to get a better silhouette of the sky. Pick out a rise or ridge line and carefully stake out your tent so that it is taught and secure. Of course, I always end up moving the tent slightly to create a better composition.
2. Tent light. To get your tent to appear ‘glowing’, place light inside. The key here is that the light needs to be diffused and low. If your light is too bright or projects a circular beam, you will most likely end up with the tent in the picture being over exposed. There are a variety of small LED lanterns on the market that are great for this; however, I’ve used a flashlight app on my smart phone as well.
3. Set up tripod and frame your shot. Position the tripod with the legs as wide as possible to maximize stability. Double check that your tripod ball head is tightened as well.
4. Try a test shot. I generally start out at f2.8 at 20 seconds ISO 800 and make adjustments from there. Focusing can be a bit difficult so if possible turn your lens to manual focus. Each company has a different marking to set you lens to ‘infinity’ but definitely check your owners manual. And don’t forget to use that self timer or remote trigger.
5. Enjoy!
And if you take enough night tent shots in a row you can make this.
Polar adventurer, expedition guide, and educator, Eric Larsen has spent the past 20 years traveling in some of the most remote and extreme environments on the planet. To date, Eric has completed more polar expeditions than any other American in history. Included in that list are the first ever summer expedition to the North Pole as well as a world record expedition to the South Pole, North Pole and top of Mt. Everest all within a 365-day period.
In March and April of 2014, Eric and team mate Ryan Waters set the American unsupported North Pole expedition ‘speed’ record traveling from northern Ellesmere Island to the Geographic North Pole in 53 days. Called Last North, this expedition may quite possibly be the last of its kind in history to reach the North Pole and will be featured in a documentary on Animal Planet in early 2015.
Eric’s other expeditions include bicycling in Antarctica, dog sledding in the Canadian Arctic and climbing Mt. McKinley. He has ridden his bike across the United States, been a backcountry ranger in Alaska and a white water canoe guide in Colorado. Eric has dedicated his adult life to sharing his love for the outdoor world with others. As an educator, Eric strives to connect people to places and issues and his adventures have been featured on on CNN, The New York Times, National Geographic, Discovery Channel, National Public Radio and MSNBC.